
Unless you are a kid or shopping for a tricycle, choosing a kid’s bike is challenging. Why you may ask. First off, there are different kids bike sizes available. Each bike has a specific wheel size, seatpost height, and standover height.
Second, you have to consider the safety of your kid because let’s face it, you are the adult. As you already know, on a bike, your kid will have to pedal, steer, and brake. If the bike is not of the right size, it will be challenging to do this.
So, what is the best kids bike size? How do you determine bike sizes for kids?
We already covered on how to get the right bike size for you so in this post, we take you through different kids bike sizes and how to measure kids bikes. We also include the kids bike size guide to help you select the right bike size for your kid(s).
What Is the Best Kids Bike Size?
Kids grow fast, and so, they outgrow all kinds of things from clothes and shoes to bikes. For example, a 1 or 2-year-old can comfortably fit and pedal a tricycle. But before you know it, their knees are knocking the handlebars as they cycle.
To ensure your kid is comfortable and continues to enjoy cycling a bike, you have to buy a bigger bike. Unlike a tricycle, a bigger bike will require training wheels, especially if your kid is 3 years and below.
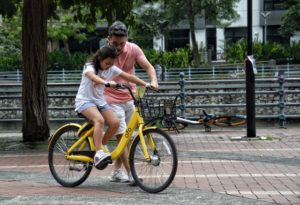
Between 4 to 8 years, most kids have generally mastered how to balance a bike, how to start and stop the bike. They are agile and have better physical coordination. Also, at this age, they are quick learners, which means they will do away with the training wheels before you know it.
Not all kids develop good balance and physical coordination early. In fact, some kids aged 10 years find it difficult to balance a bike without training wheels. If this happens to you, buying a bigger bike size is not the solution. What you need to have is patience.

Back to kids bike sizes. The bike industry has different sizing for different bikes. Basically, the industry has a different kids bike size guide for mountain bikes, electric bikes, and kid bikes.
So, how do you measure a kid’s bike?
How to Measure Kids Bike
If you choose to shop from a physical store in your city, take a tape measure, a pen, and paper. At the store, size up available bike designs. If you find one that you believe is the right fit for your kid, take out your tape measure.
Now, measure the diameter of the tire. Record the tire diameter. What you need to know is that this value also represents the bike frame size. Besides using your tape measure, you can look at the tire for its size.
Check for (nn” x n.n”). The first dimension (nn”) indicates the tire diameter while the second (n.n”) is the tire thickness. Record these values and use the bike sizing chart below to find the right bike size for your child.
Methods for Determining Which Bike Size Your Kid Needs
Learning how to balance, pedal, and brake a bike is a significant milestone in your kid’s life. But before buying a kid’s bike and strapping a helmet on his head, you must find the right bike size for your kid.
Why you may ask. If you buy a bike that’s too small or too large, it will be difficult for your child to balance, pedal, brake, and control the bike. As such, your kid may end up falling or crashing into objects.
To ensure your child enjoys cycling and is safe while pedaling, it’s vital to understand kids bike sizes.
Here is how to determine the right bike size for your child.
Measure Your Child’s Inseam
Before you take out your laptop, smartphone, or tablet, and open your favorite online store and add a bike to your shopping cart, measure your child. Specifically, you need to measure your child’s inseam.
Here is how you should go about it.
You will begin by measuring your child’s height. So, have your child stand against the wall without any shoes on. Instruct your child to position his feet apart – less than a shoulder length.
Take a measuring tape and measure from the floor to the top of his head. Record the measurements. Next is the inseam.
While still standing against the wall, place a book between his legs. Make sure the spine is up and firmly between your child’s crotch but not squishing his genitals. Ensure that the book is level with the floor. Mark where the book spine meets the wall.
Have your child move away and now measure from the floor to the mark and record the results. That’s how you measure the inseam.
Why is it important to measure your child’s inseam? There are several reasons why you need to measure your child’s inseam. First off, this measurement allows you to determine if your child can reach the floor safely with both feet while sitting on the saddle.
To balance the bike correctly, your child’s feet should touch the feet comfortable while the knees are slightly bent. This allows your child’s feet to run efficiently on the bike. For this to happen, the seat should be set between 1-inch and 1.5 inches below the child’s inseam.
Consider the Rider’s Experience
Another factor that can help you buy the right bike size for your kids is the rider’s experience. What experts have determined is that there is a progression that happens with children on bikes.
First off, when children start learning how to pedal a bike, they are confident only if they have their feet flat on the ground while on the saddle. Experts refer to this as the Learner Fit. If the child’s feet cannot reach the ground while sitting on the seat, the child will not be confident.
Why you may ask. This is because the child will be afraid of falling off the bike or crashing into objects.
Second, kids who cannot get their feet flat on the ground while on the bike seat will be on their tiptoes. Experts call this the Pedaler Fit.
Last, we have Advanced Fit. At this stage, the rider is very good at controlling the bike and can brake safely. The rider can also balance the bike and is not intimidated by being high off the ground or pedaling on the street.
Most kids fall between Learner Fit and Pedaler Fit.
If your child falls under the Learner Fit category, you will have to install training wheels. Training wheels allow your child to balance the bike. This is because he can only touch the ground with his tiptoes while on the seat.
If you install training wheels, set the seat height 0 to 3 inches above the child’s inseam. After training wheels, your child’s feet should be able to touch the ground while seated on the bike. This allows for starting and braking the bike without falling off.
Basically, at this age, your child has better pedaling efficiency and leg extension. If buying a new bike for your child, make sure the seat height is the same height as your child’s inseam.
As your child grows, you will have to set the seat height higher. This allows for maximum pedaling efficiency and leg extension. But you can’t do this for long with a small bike. So, if your kid is a confident pedaler and you are planning on buying a new bike, make sure the seat height is 2 inches to 4 inches above your child’s inseam.
Use a Kids Bike Size Chart
Besides measuring your child’s inseam and taking into consideration their riding experience, use a bike chart to buy the right bike. The biking industry already uses kids bike size charts. You can find them in bike shops, discount warehouses, online stores, and toy stores.
For now, you don’t have to get in your car and drive to a local bike store to get the chart. We have got you covered. Here is a sample kid’s bike size chart.
Kids Bike Sizes Height Chart
Age | Child’s Height | Wheel size | Type of bike |
2 to 3 years | 85 to 100 cm | 12 inches (30 cm) | Toddler bike |
3 to 4 years | 95 to 110 cm | 14 inches (36 cm) | Balance bike |
4 to 5 years | 110 to 120 cm | 16 inches (41 cm) | Middle wheeler |
5 to 8 years | 120 to 135 cm | 20 inches (51 cm) | BMX |
8 to 11 years | 135 to 145 cm | 24 inches (61 cm) | Mountain/road bike |
11+ years | 145 cm+ | 26 inches (66 cm) | Mountain/road bike |
Besides your child’s height, you can use the inseam length.
Kids Bike Sizes Inseam Length Chart
Age | Child’s Height | Wheel Size | Type of Bike |
2 to 3 years | 35 to 42 cm | 12 inches (30 cm) | Toddler bike |
3 to 4 years | 40 to 50 cm | 14 inches (36 cm) | Balance bike |
4 to 5 years | 45 to 55 cm | 16 inches (41 cm) | Middle wheeler |
5 to 8 years | 55 to 63 cm | 20 inches (51 cm) | BMX |
8 to 11 years | 60 to 72 cm | 24 inches (61 cm) | Mountain/Road Bike |
11+ years | 70 cm+ | 26 inches (66 cm) | Mountain/Road Bike |
Years 2 to 3
At this age, most kids start with balance bikes or a two-wheeler with 12-inch wheels and training wheels. A balance bike is pedaless, and most do not have brakes. All your child has to do to ride a balance bike is by scooting with his feet on the ground.
Experts recommend that kids start using balance bikes. This is because they help to build your child’s confidence. Also, they help to develop their sense of balance.
Years 3 to 4
After training with a balance bike, experts recommend that kids start using small wheelers. As the first pedal bike for your child, it features freewheel hubs and brakes. So, if you are looking for a small wheeler, we recommend that you keep things simple.
Choose a model with coaster brakes. Such a model requires less coordination. Small wheelers have 14-inch wheels. But you can also buy a bike within the following range – 12 to 16-inch wheels.
Years 5 to 8
After small wheelers, you have middle wheelers. This type of bike has 16-inch wheels. Besides the wheels, the bike has handbrakes, a gear set, and a freewheel hub. The freewheel hub allows the rider to pedal backward.
Other features include a frame made of aluminum or steel.
Years 7 to 11 years
Children aged 7 to 11 years have mastered physical coordination, balance, and confidence. Also, they have overgrown the small and middle wheelers and are ready for mountain bikes.
Best bikes for this age group range from 20 inches to 26 inches in wheel size. These bikes have several features:
- Wide knobby tires
- Dual, hardtail, rigid or full suspension
- Aluminum, steel, titanium and carbon fiber frames
- Gear system
- Disc, or rim brakes
Due to the addition of advanced features, mountain and road bikes are expensive. So, if you plan on buying a mountain bike for your child, we recommend that you start with a simpler version.
Use the Bike Specs
A bike that fits well and is right for your child’s height and inseam length is a bike your child will love cycling. But a bike with a high standover height than the inseam will lead to inefficient riding. It will also lead to general discomfort, muscle aches, and pain.
If this continues, it will discourage the child from riding the bike. To avoid this, you need to find the right bike size. Another method we recommend is using bike specs. Every brand lists specifications for each model they make.
- These specifications include standard (small, medium, large) sizes and numerical sizes. Besides the bike size, you will also find other specs such as:
- Frame type
- Fork type
- Handlebars
- Saddle
- Brakes
- Grips
- CranksetChain
- Pedals
- Gear ratio
- Gear inches
- Tubes and tires
What you need to keep in mind is that different brands or bike models differ even though they have a similar wheel size. For example, you can come across a bike with 20-inch wheels. But the seatpost height is higher compared to another 20-inch wheeled bike.
So, it’s important to check the seatpost size in the specifications list. If the value is not available, contact the brand’s support team.
Another reason why you should check the bike’s specs is to know if the bike is for boys or girls. Bikes for girls are shorter than those for boys. In fact, they have shorter stack heights and shorter reach lengths.
Despite this, you need to know that bikes are generally unisex unless when it comes to color, specific frame designs, and other accessories. Speaking of bike frames, a classic girl’s bike will have a step-through frame.
This is a downward-sloping top tube design that dates back to the day’s girls wore long skirts. But today, girls can ride boys’ bike with ease. This is possible by buying the right bike size or adjusting movable parts such as the seat, handlebars, stem, and suspension.
Measure the Bike’s Standover Height
The standover height refers to the clearance between your child’s crotch and the bike’s top tube. Experts recommend a general standover height of no more than 1 to 3 inches. This clearance is perfect as it allows your child to hop off quickly when required.
If you opt to buy a bike with a traditional straight top tube, make sure there is a 1-inch clearance between your child’s inseam length and standover height. If you choose a bike with a sloping top tube, ensure a 2-inch clearance between the inseam and standover height.
For example, your child has been practicing for a few days. As he rides bikes, the brakes fail. If the standover height were higher than your child’s inseam length, that would be an accident waiting to happen.
Why you may ask. This is because it would be difficult for your child to dismount safely.
So, how do you calculate the standover height? Check the bike specs on the manufacturer’s website and look for the standover height. If you have not taken your child’s inseam length, here is how to do it.
Take a pen, a tape measure, and ask your child to stand against one wall. Make sure your child is standing flat-footed on the ground. Take the book and place it between the legs.
Press it up against the crotch but without causing any discomfort or harm. Ensure the book is level before making a mark on the wall where the book and the wall meet. Using the tape measure, measure the distance from the floor to the target.
That is your child’s inseam length. To know the clearance, find the difference between the inseam length and standover height.
So, when buying your child, a bike, make sure the inseam and standover height fall within the target ranges. For example, if your child’s inseam length is 20 inches, buy a bike with a standover height of 18 to 19 inches.
Buying Your Child’s New Bike
There is no better time than your child’s birthday and Christmas to shop for a brand-new bike for him or her. Here is the first rule. Do not shop alone. Take your child with you. Doing so will make it easier for you when checking the right fit.
There are several places where you can shop for your kid’s bike. You can buy at a local toy store, discount warehouses, and big box stores. Don’t forget to check out your local neighborhood bike shop.
At these stores, not only will you find a wide selection of bikes. But you will meet knowledgeable and experienced salespersons. They can help you make the smartest decision for your kid. Besides helping you select the right bike size, they will offer maintenance and assembly tips.
It’s essential to test the bike. This will help you know if the difference between the inseam and standover height is 1 inch and over. Other specifications to check include seatpost height, frame design, and others.
Once you buy the bike and are back home, take the bike for a test ride. First off, choose a safe riding area. Second, make sure your child is comfortable and balanced. Third, teach him to steer, pedal, and brake. Make sure that you are closeby supporting your child.
If you do this correctly, your child will enjoy riding his bike.
There are a couple of things to keep in mind. Never buy a bike too large for your child, hoping they will grow into it. Instead, use our bike size chart. Make sure your child learns how to use the brakes and knows the difference between the front and back brakes.
Lastly, always ensure your child wears a helmet before riding his bike.
Final Thoughts on Kids Bike Sizes
Besides the methods above, there are tools online that can help determine the right bike size for your child. A majority of these tools are available on bike manufacturer sites. The tools are easy to use.
They have a slider that allows you to select your child’s height. After you choose the height, enter your child’s birth month and year. Using an algorithm, the tool will compute the right bike size for your kid.
Apart from these tools, you can always consult a professional at a local bike store, especially if you want it to be a surprise for your child.
Also, if you prefer video guides, Global Cycling Network created a complete guide for kids bike sizes and you can check it out here:
Remember, be responsible when teaching your child how to ride a bike and always make sure he wears a helmet.
Best of luck!